
Clearing underbrush by hand: A Pro's Complete Guide
- Mike Walker
- Dec 20, 2025
- 13 min read

Clearing underbrush by hand is more than just yard work; it's a precise and effective way to reclaim overgrown property, create a fire-safe space, and manage your land with a light touch. It’s a hands-on approach that gives you complete control, letting you selectively remove what you don't want while saving the plants you do. This timeless practice isn't just about the labor—it's about strategically restoring your land's health and natural beauty.
Why Manually Clearing Underbrush Still Matters

In an age of powerful machinery, opting to clear land with hand tools might seem a bit old-fashioned. But this method offers distinct advantages that bulldozers and forestry mulchers simply can't match, especially on trickier or more sensitive properties.
The biggest win is precision. You get to meticulously choose which plants stay and which go, protecting mature trees, native flora, and delicate ecosystems from getting trampled. This is especially critical on sloped land where heavy equipment can cause serious soil erosion, or in smaller, dense patches where a machine just won't fit.
The Benefits of a Hands-On Approach
Clearing by hand is a direct conversation with your property. It helps you really understand the land’s contours, the state of the soil, and its unique ecological rhythm. The benefits are real and immediate:
Wildfire Prevention: By removing "ladder fuels"—all those low-hanging branches and dense shrubs—you create a defensible space around your home. This simple act drastically reduces the chance of a ground fire climbing into the tree canopy, which is often what leads to catastrophic structure loss.
Healthier Soil: Unlike heavy machinery that compacts soil and messes up its structure, hand tools cause minimal disturbance. This preserves the delicate network of microorganisms underground that are absolutely essential for healthy plant growth.
Targeted Weed Control: You can zero in on invasive species and get them out by the root, stopping them from spreading. This is a far cry from spraying broad-spectrum herbicides that can wipe out beneficial plants and insects along with the bad guys.
Manual clearing is a timeless skill. For generations, it has been a fundamental practice for land stewardship and preparation. Historical records show crews using hand tools to clear large areas for agriculture and forest management. You can discover more about historical land practices and their impact.
Ultimately, clearing underbrush by hand isn't just a chore—it's an investment. It’s a powerful strategy for improving your property’s safety, curb appeal, and ecological vitality, all while giving you a well-earned sense of accomplishment.
Preparing for a Safe and Successful Clearing Project

Before you even think about cutting a single branch, the most important thing you can do is conduct a thorough site assessment. This is your battle plan for clearing underbrush by hand.
Get out there and walk the entire perimeter of the area you plan to clear. You need to know exactly where your property lines are, get a feel for any slopes, and—most importantly—spot any potential hazards before they find you.
Hidden dangers are more common than you'd think. I’ve seen it all: low-hanging utility lines hiding in the canopy, old fence wire completely swallowed by brush, and angry ground-nesting hornets. Here in Central Florida, you absolutely have to identify poison ivy, poison oak, and poison sumac before you’re deep in the thick of it. Mark these spots with brightly colored flagging tape. Trust me, it can save you a world of hurt.
Gearing Up: Don't Skip the PPE
Personal Protective Equipment (PPE) is completely non-negotiable. It's the only thing standing between a productive day of work and a trip to the emergency room. Every piece of gear has a purpose, and this is not the place to cut corners.
Here’s a quick rundown of the gear I never work without. Each piece is crucial for keeping you safe and focused on the job.
Gear Type | Why It's Essential | Recommended Features |
|---|---|---|
Safety Glasses or Goggles | Protects your eyes from whipping branches, flying wood chips, and hidden thorns. One stray branch is all it takes for a serious eye injury. | Look for an ANSI Z87.1 rating to ensure it's shatterproof. |
Heavy-Duty Work Gloves | A good pair of leather or reinforced synthetic gloves is a must to prevent nasty blisters, cuts, and splinters that can stop you in your tracks. | Reinforced palms and a snug fit for better dexterity. |
Long-Sleeved Shirt and Pants | This creates a physical barrier against abrasive plants, biting insects, and the oils from poison ivy. It's your first line of defense. | Breathable but durable fabric to handle the Florida heat. |
Steel-Toed Boots | Sturdy, ankle-high boots protect your feet from falling logs, sharp stumps, and twisting an ankle on uneven, hidden ground. | Ankle support and a good, non-slip tread are key. |
Getting the right gear isn't just about safety; it's about efficiency. When you aren't constantly worried about getting hurt, you can work with confidence and focus completely on the task at hand.
Check Local Rules Before You Start
Finally, a quick check of local ordinances can save you from a major headache down the road. Many counties in Florida have very specific rules about debris disposal. For instance, you might run into seasonal burn bans that prohibit burning brush piles, meaning you’ll need a plan to haul the debris away or chip it instead.
Knowing these rules beforehand helps you map out your project from start to finish. This kind of foresight is a huge part of what makes clearing land without heavy equipment so manageable. When you understand the local guidelines, you ensure your project is not only safe but also fully compliant, helping you avoid potential fines or delays.
Choosing Your Arsenal of Hand Tools
The right tool for clearing underbrush does more than just make the job easier—it makes it possible. You don't need a shed full of every gadget imaginable. Instead, success comes from having the right tools for the specific tasks you'll face: cutting, pulling, and digging. Think of it as putting together a small, specialized crew where each tool has a critical role to play.
Your main battle will be cutting through a mix of thin vines, thorny briars, and surprisingly stubborn woody saplings. This is where your cutting tools become the stars of the show. And while a good axe has its place, it's often overkill for the more surgical work needed in dense undergrowth.
Essential Tools for Cutting
Most of your time and effort will be spent severing stems, branches, and small trunks. Each of the tools below offers a different balance of raw power and fine-tuned precision.
Loppers: These will be your go-to for branches up to about two inches in diameter. Always opt for a bypass lopper, where the blades sweep past each other like scissors. This gives you a clean cut, which is much healthier for any nearby plants you want to keep. Models with long, extendable handles are fantastic—they give you incredible leverage and save your back and arms a lot of strain.
Pruning Saws: When a branch is just too thick for loppers, a pruning saw is your best friend. Look for one with a curved blade and aggressive teeth; it will make quick work of woody material. It also gives you far more control than an axe, letting you cut a sapling precisely at its base without tearing up the surrounding soil.
Brush Axe or Machete: If you're facing down large areas of non-woody growth like thick grasses or briar patches, a brush axe (sometimes called a brush hook) or a heavy-duty machete is invaluable. The weighted blade uses momentum to slice through dense clumps with surprising efficiency.
I see this all the time: someone trying to force a tool to do a job it wasn't made for, like hacking at a 3-inch sapling with a small pair of loppers. You'll just exhaust yourself and probably break your tool. Match the tool to the task, and you'll work smarter, not harder.
Tools for Pulling and Grubbing
Cutting plants at the surface is only half the fight. To stop things from growing right back—especially invasive species—you have to get the roots. This is where grubbing tools come in, designed to give you the leverage you need to win the war against stubborn root systems.
A grub hoe or a mattock is perfect for this kind of work. Its heavy, adze-like blade lets you chop into the soil and sever roots deep below the surface. The weight of the tool does most of the work, breaking up compacted earth and exposing the root ball.
For pulling out whole saplings, roots and all, a high-leverage pulling tool is an absolute game-changer. These tools grip the base of the plant and use a long handle as a lever to pop it right out of the ground with minimal digging. They're incredibly effective on plants up to a couple of inches in diameter and can seriously speed up your progress while causing less soil disturbance.
You can find a more detailed breakdown in our comprehensive guide covering the best equipment for clearing underbrush. It'll help you decide which tools are the smartest investment for your specific property.
Your Strategic Approach to Clearing Underbrush
When it comes to clearing underbrush, jumping in with a pair of loppers and pure determination is a recipe for exhaustion. I've seen it time and again. The real secret is to approach it with a solid strategy, not just brute force. A methodical workflow will save your back, keep you safe, and give you a much cleaner result when you’re clearing underbrush by hand.
The best way to start is by working from the outside in. Before you dive into the thick of it, clear a path around the entire perimeter of your work zone. This one simple move is a game-changer. It gives you a clean boundary, provides multiple escape routes if you stumble upon a snake or a wasp nest, and creates a clear space to stack debris so it doesn't trip you up later.
Work in Layers, From Top to Bottom
With your perimeter set, it’s time to look at the underbrush in three distinct layers. Tackling them in order is the key to preventing a tangled mess and making sure you get everything.
Take on "Ladder Fuels" First: Start by looking up. Ladder fuels are those low-hanging tree limbs and woody vines that a ground fire could easily use to climb into the tree canopy. Grab a pole saw or loppers and cut these branches back flush with the trunk. Getting this overhead clutter out of the way first is a huge help—it stops branches from snagging you and your tools while you work below.
Cut Down Surface-Level Growth: Next, bring your focus down to the shrubs, small saplings, and thorny briars. With your loppers and pruning saw, cut everything down to a few inches above the ground. Don't even think about the roots yet. The goal right now is simply to clear the vertical growth so you can actually see the ground you're working on.
Grub Out the Roots: Now for the tough part. With all the top growth gone, you can finally get to the root systems. Use a grub hoe, mattock, or even a Pulaski to dig around stubborn stumps and roots. You want to sever them from the ground so you can pull the entire root ball out. It’s physically demanding, no doubt, but skipping this step is a guarantee that everything will grow right back, especially aggressive invasive species.
This flowchart breaks down the simple but effective process you'll follow with your tools.
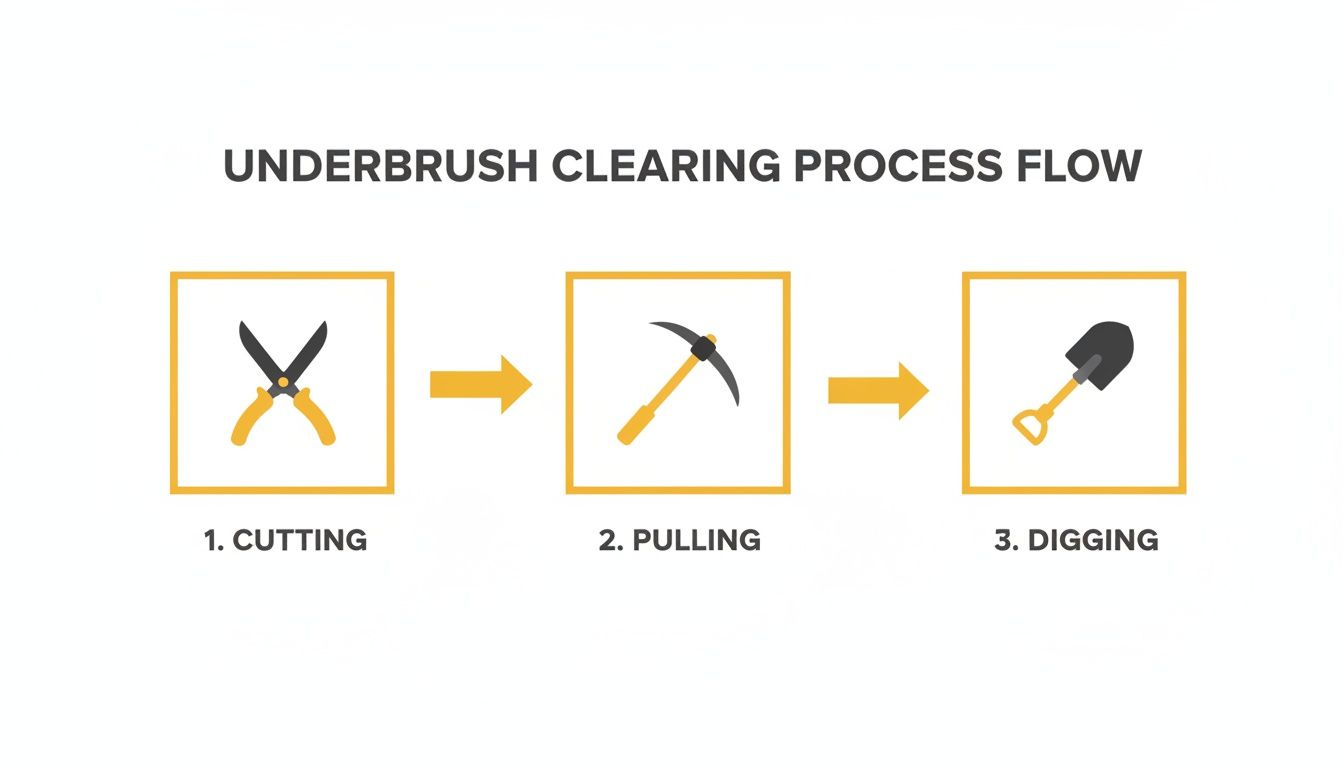
It’s all about moving from cutting what you can see above ground to digging out the stubborn roots that lie beneath.
The Cut and Stack Technique
As you’re cutting, it’s tempting to just toss the branches and vines aside. Don't do it. That's how you create a chaotic, dangerous worksite full of tripping hazards. Instead, get into the habit of the cut and stack method.
Pick a spot—or a few spots—for your debris piles, preferably along the perimeter you already cleared. Every time you cut down a section of brush, take a moment to carry it over to the pile. It might feel a bit slower at first, but it keeps your immediate work area completely clear. This lets you move around safely and makes the final cleanup job infinitely more organized.
Keeping your workspace clear isn't just about being tidy; it's a fundamental safety practice. A tangled worksite is where most slips, trips, and falls happen. A clean floor is a safe floor, even when that floor is the forest.
This methodical approach does more than just make the job easier; it makes your property safer. Studies have shown that this kind of manual fuel reduction can decrease potential wildfire intensity by a staggering 30-70% in areas that have been treated. Some forestry programs have managed to drop surface fuel loads from over 20 tonnes per hectare down to just 5 tonnes. You can read the full report about global forest management to see the data for yourself. By following these steps, your hard work directly contributes to a healthier, more resilient landscape.
Managing Debris and Preventing Regrowth
So you've put in the hard work, and the underbrush is finally gone. You can see the true potential of your property for the first time. But the job isn't quite finished.
Now, you’re looking at a mountain of branches, vines, and roots. What you do with this pile of green waste is just as crucial as the clearing itself. Properly managing this debris and stopping aggressive regrowth are the final, critical steps to protect your investment of time and sweat.
Smart Debris Disposal Options
You’ve got a few great options for handling all that cleared vegetation, and each comes with its own set of perks.
The easiest and most eco-friendly choice is often to chip the brush. Renting a wood chipper for a day can turn those massive brush piles into a manageable mound of valuable mulch. This fresh mulch can then be spread right back over the areas you just cleared.
Spreading a thick layer of wood chips—about four to six inches deep—is a fantastic way to smother new growth. It blocks sunlight from reaching stubborn weed seeds and helps the soil hold onto moisture, creating a much healthier foundation for any new plants you want to bring in. You can learn more about the specific benefits of using mulching for sustainable land management right here on our blog.
Another fantastic option is to build habitat piles. By strategically stacking the logs and bigger branches in an unused corner of your lot, you create a safe haven for wildlife like rabbits, birds, and beneficial insects. It’s a low-effort way to give back to the local ecosystem.
Controlled burning is a third path, but it demands extreme caution. You must check with your local fire department for permits and stay on top of any burn bans, which are common during Florida's dry seasons. A well-managed burn can quickly return nutrients to the soil, but the risks are huge if you don't have experience.
Never underestimate the final phase of a land clearing project. Improper debris management can create fire hazards, while ignoring regrowth means you'll be doing the same job again next year. Finish strong by planning for disposal and prevention.
To help you decide, here’s a quick breakdown of your main disposal options.
Debris Disposal Methods Comparison
Method | Pros | Cons | Best For |
|---|---|---|---|
Chipping & Mulching | Eco-friendly, creates free mulch, suppresses weeds, retains soil moisture. | Requires renting or owning a wood chipper, can be labor-intensive. | Properties where you want to enrich the soil and prevent immediate regrowth. |
Habitat Piles | Low-effort, beneficial for local wildlife, no cost involved. | Can attract unwanted pests if too close to a home, takes up space. | Larger properties with out-of-the-way corners to support the local ecosystem. |
Controlled Burning | Quickly clears debris, returns nutrients to the soil. | High fire risk, requires permits, not always allowed due to burn bans. | Experienced individuals on large, rural properties where it's legally permitted. |
Hauling Away | Completely removes debris from the property, very clean result. | Can be expensive, less environmentally friendly. | Small properties with limited space or when you need a perfectly clean slate immediately. |
Each method has its place. Choosing the right one depends on your budget, your property's needs, and your long-term goals for the land.
Preventing Aggressive Regrowth
Once the debris is dealt with, your focus needs to shift to keeping the area clear for good. Nature hates a vacuum, and that bare soil is an open invitation for weeds and invasive species to move right back in.
Besides a good layer of mulch, think about planting competitive native groundcovers. Plants adapted to Central Florida's climate, like Sunshine Mimosa or certain ferns, can establish themselves quickly and outcompete unwanted brush before it ever gets a foothold. This approach creates a beautiful, low-maintenance landscape that also supports local pollinators.
Finally, get into a simple maintenance routine. Just walk the cleared area once a month with a pair of loppers. Snipping out any new saplings or invasive shoots when they're small and weak takes minutes, but it prevents them from becoming another major clearing project down the road. This little bit of proactive work is the real secret to enjoying your beautifully cleared land for years to come.
Knowing When to Call a Professional
Even the most dedicated DIYer has a breaking point. A huge part of successfully clearing underbrush by hand is being honest with yourself about when a project has outgrown your tools, your schedule, and your physical limits. Pushing past that point isn’t just slow going—it can get dangerous, fast.
Take a good, hard look at the job ahead. Are you dealing with a quarter-acre of light brush, or are you staring down five acres of dense, tangled thicket? A small, manageable plot is perfect for getting your hands dirty. But when you're talking about vast acreage, you need the sheer power and speed of professional gear like forestry mulchers. Think about your timeline, too. A job a pro crew could knock out in a day might eat up every single one of your weekends for a month.
Red Flags That Signal It's Time for Help
Some situations are immediate deal-breakers for a DIY approach. These are the red flags that mean picking up the phone is the safest, smartest move you can make. Don't think twice about calling in the pros if your property has:
Dangerously Steep Slopes: Trying to work on a serious incline is just asking for trouble. The risk of slips, falls, and injuries skyrockets. Professionals have specialized equipment built to operate safely on the kind of tricky terrain that would send a lawn tractor tumbling.
Mature Trees and Large Stumps: Let's be clear: your hand tools aren't meant for felling big trees or tackling deep-rooted stumps. That’s heavy-duty work calling for hydraulic power and people who are trained to use it safely.
Widespread Invasive Species: If your land is completely overrun with stubborn invasives like Brazilian Pepper or the dreaded cogon grass, just cutting them down is a temporary fix. A professional service can bring in an integrated strategy, often including targeted herbicide applications, to make sure they don't just grow right back.
Realizing you need backup isn't a sign of defeat—it's the mark of a smart property owner. Getting a professional quote is the best way to weigh their cost against your own time, your physical well-being, and the quality of the final outcome.
When you start looking for a reputable company, do your homework. Check for licenses, insurance, and ask for local references. Ask them plenty of questions about their process, especially how they handle soil disturbance and get rid of the debris. A good quote should break everything down—the exact services, the equipment they'll use, and the total cost—so there are no surprises. That kind of clarity lets you make a final decision with confidence.
Ready to tackle a project that's too big for hand tools? Palm State Clear Cut offers professional land clearing services across Central Florida, transforming overgrown properties with efficiency and expertise. Get your free quote today!
Comments